Since St. Patrick’s Day is right around the corner, I thought it would be the perfect time to share with you some of my very favorite St. Patrick’s Day treats that I’ve made throughout the years.
Have a wonderful weekend and a happy St. Patrick’s Day everyone!!
~Enjoy~


Irish Cream Cupcakes with Irish Cream Buttercream Frosting
Irish Cream Cupcakes
4 cups all-purpose flour
2 teaspoons baking powder
1/2 teaspoon salt
1 1/3 cups Irish Cream
2/3 cup water
2 tablespoons milk
2/3 cup butter, room temperature
2 cups granulated sugar
2 large eggs
2 teaspoons vanilla extract
Directions:
Preheat oven to 350 degrees. Grease and flour cupcake tins or line with paper liners.
In a medium bowl, combine flour, baking powder and salt; set aside.
In another medium bowl or measuring cup, combine Irish Cream, water and milk; mix well.
In large bowl, cream butter and sugar together until light and fluffy. Add eggs and vanilla extract; beat well. Alternately add the flour mixture and Irish Cream mixture to the butter mixture. Beat for approximately 2 minutes.
Spoon batter into cupcake tins, filling cups about 2/3 full. Bake for 15-20 minutes, or until tops spring back when lightly touched. Remove from oven and place on wire rack to cool.
Frost cooled cupcakes with Irish Cream Buttercream Frosting; if desired. (recipe below)
Makes approximately 30 cupcakes.
Irish Cream Buttercream Frosting
1 cup butter, softened
4 cups powdered sugar
2 tablespoons Irish Cream
3-4 drops green food coloring
decorative sprinkles
Directions:
Cream butter with an electric mixer until light and fluffy. Gradually add powdered sugar; mix until completely combined. Add Irish Cream and food coloring; beat until well combined. If necessary, add more Irish Cream to thin or more powdered sugar to thicken frosting to desired texture.
Frost cooled cupcakes and sprinkle with decorative sprinkles.

Pistachio Cake
6 teaspoons Ener-G Egg Replacer
8 tablespoons water
1 (18-1/4 ounce) package yellow cake mix
2 (1 ounce) packages Fat-Free Sugar-Free Jell-O Instant Pistachio Pudding & Pie Filling Mix
1 cup water
3/4 cup vegetable oil
Glaze
1 cup powdered sugar
1 tablespoon butter, softened
2 to 3 tablespoons milk
Preheat oven to 350 degrees. Grease and flour a 10-inch fluted tube pan.
Combine Ener-G Egg Replacer and the 8 tablespoons of water in a small glass or bowl. Mix well.
In a large bowl, combine the cake mix, pudding mixes, water, oil, and the egg mixture.
Beat with an electric mixer on low speed for 30 seconds. Beat on medium speed for 2 minutes.
Pour batter into prepared tube pan. Bake for 60-70 minutes, or until a toothpick inserted near the center comes out clean.
Cool in pan for 10 minutes. Remove to a wire rack to cool completely.
In a small bowl, combine the glaze ingredients. Drizzle over cooled cake.
Yields 12 servings.

Homemade Irish Cream
Homemade Irish Cream
1 (14 ounce) can sweetened condensed milk, or 14 ounces of homemade sweetened condensed milk (recipe below)
1 1/2 cups Irish whiskey
1 teaspoon instant coffee granules
2 tablespoons chocolate syrup
1 1/2 teaspoons vanilla extract
1 teaspoon almond extract
Directions:
Combine all ingredients in a blender. Blend on high power for about 20-30 seconds.
Store tightly sealed in the refrigerator. Shake well before using.
Makes approximately 25.4 fluid ounces.
Homemade Sweetened Condensed Milk
1/2 cup cold water
1 1⁄3 cups nonfat dry milk powder
3/4 cup granulated sugar
1 teaspoon vanilla extract
Directions:
In a medium bowl, stir milk into cold water. Microwave on high for 1 minute. Stir in sugar & vanilla extract. Refrigerate and cool before using.
Yields approximately 1 and 1/3 cups.
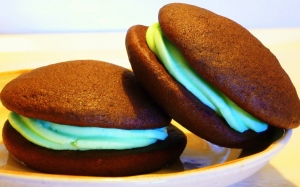
Chocolate Mint Whoopie Pies
Chocolate Mint Whoopie Pies
2 cups all-purpose flour
1/2 cup unsweetened cocoa powder
1 1/2 teaspoons baking soda
1/2 teaspoon salt
1 stick butter, softened
1 cup granulated sugar
1 large egg
1 cup milk
Directions:
Preheat oven to 400 degrees. Line baking sheets with parchment paper.
In a medium bowl, sift together the flour, cocoa powder, baking soda and salt; set aside.
In a large mixing bowl, cream the butter and sugar together until fluffy. Add the egg and beat until combined. Add dry ingredients, alternating with milk, and mix until just blended.
Drop batter by tablespoonfuls, about 2 inches apart, onto prepared baking sheets.
Bake for 6-7 minutes, until cakes spring back when touched. Remove from oven and let cool on pan for 2 minutes. Transfer cakes to wire racks to cool completely.
Match cakes in pairs so tops and bottoms are similar in shape. Spread bottoms with Mint Cream Filling, recipe below, and cover with top.
Makes 18 whoopie pies.
Mint Cream Filling
6 tablespoons butter, softened
4 cups powdered sugar
1 teaspoon mint extract
4-5 drops green food coloring
3-4 tablespoons milk
In a medium bowl, combine butter, powdered sugar, mint extract, food coloring, and milk. Mix until smooth. Spread on the bottoms of half of the cookies; top with remaining cookies.

Irish Cream Chocolate Chip Cookies
Irish Cream Chocolate Chip Cookies
2 1/2 cups all-purpose flour
1/2 teaspoon baking powder
1 teaspoon baking soda
1/2 teaspoon salt
1/2 cup butter, softened
1/2 cup granulated sugar
1/2 cup brown sugar, packed
1 egg
1 teaspoon vanilla extract
1/2 cup Irish Cream
2 cups chocolate chips
Directions:
Preheat oven to 325 degrees.
In a medium bowl, combine flour, baking powder, baking soda, and salt; set aside.
In a large mixing bowl, cream butter, granulated sugar, brown sugar, and egg together until light and fluffy. Add vanilla extract and Irish Cream; mix until combined.
Gradually add dry ingredients to butter mixture and blend well. Fold in chocolate chips.
Shape dough into 1-inch balls. Place on ungreased cookie sheets 1 1/2 inches apart. Flatten with the bottom of a glass coated with non-stick cooking spray.
Bake for 8-10 minutes, or until golden brown. Cool on cookie sheet for 1 minute. Remove to a wire rack to cool completely.
Makes approximately 4 dozen cookies.
Filed under: Baking, Cake, Cookies, Cupcakes, Liqueur, Recipes, St. Patrick's Day, Whoopie Pies | Tagged: Alaska, Baking, blog, Cake, chocolate mint whoopie pies, Cookies, Dessert, food, holiday, homemade, homemade Irish Cream, homemade sweetened condensed milk, Irish Cream, Irish Cream Buttercream Frosting, Irish Cream Chocolate Chip Cookies, Irish Cream Cupcakes, irish cream liqueur, mint cream filling, photo, pistachio cake, Recipe, recipes, St. Patrick's Day, whoopie pies, wordpress | 4 Comments »


